Showing posts with label Crafty. Show all posts

Saturday, October 8, 2011

Menu Plan Monday- Week of October 3, 2011

So I'm a little late this week, but I have good reason,
I promise...
I represented CraftGossip at The Martha Stewart Show!!! 
You can read about my adventure here.


Our menu plan from last week was awesome.
We loved every soup that we made. 
Our ultimate favorite was the
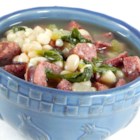
Sausage, Kale, and White Bean Soup Recipe

It is delicious and so fresh. 
I used Argentinian Sausage from Publix
because it had the most healthy ingredients 
and I actually knew what everything was that was in them 
(Some of the sausages had high fructose corn syrup...
Why...why? Really? Is that necessary? )

Here is what we have left from our produce share:

BOK CHOY (1 head)

CARROTS

ROMAINE LETTUCE

YELLOW ONIONS

CURLY PARSLEY

YELLOW GINGER

RED PLUMS

NECTARINES
NEW POTATOES
FLORIDA AVOCADOS


Here's our menu plan for the week! 

Breakfasts:
I can't recommend highly enough that you try this.... for some breakfast this week:
Dutch Babies II Recipe
Dutch Baby Pancake- serve w/ heated up jam and syrup w/ sliced peaches

Eggs & Toast
Cereal 
Lunches: 


IMG_5946

Easy Snack Wraps Recipe
Leftovers
Snacks:
Fresh Cut Fruits and Veggies
 Coconut Snacks Recipe
Sweet Snack- Coconut Balls
Banana Tortilla Snacks Recipe
Dinners:
Monday:
Beef and Mushroom Stroganoff, Aussie Style Recipe 
Beef Stroganoff
( I use my own recipe which I don't have posted, but this one is very similar except
I also add Ketchup and use sour cream instead of heavy cream)
Tuesday: 
Japanese Beef Stir-Fry Recipe
Wednesday:
Herbie's Home Fries Recipe 
Leftovers & Home Fries


Thursday:
Grilled Chicken w/ Potato Fries and Broccoli

Friday:
Leftovers

Saturday: 
Headed to Friends' Home for Dinner


Sunday:
It's Chili by George!! RecipeGrandmother's Buttermilk Cornbread Recipe


Thanks!


share on: facebook

Thursday, December 31, 2009

Things I Made For Christmas

This year opened a whole new world for me...Crafting, who knew?

I "made" a few gifts this year, and wanted to share a few of them...
My Sister-In-law's Great Grandmother "nearly" finished a quilt, so for Christmas, I helped it along a little and finished it up..hopefully doing it justice.
It is entirely hand quilted and full of fun scrap fabrics.
I also made a scrap fabric journal for my sister-in-law and sister, these photo's are before I attached the buttons, but you get the picture...
You can see the tutorial here from Happy Together.
(She's a craft genius BTW)


This is coincidentally the fabric that I used to make
her a quilt last year for Christmas.
And then, my favorite little craft of the year....
a little piece of my heart.

When my grandmother died the week before Christmas,
I had to quickly fly out for the Memorial Service.

For the first time, I had to leave my
little Lily behind...sniffle sniffle.

That day, I quickly went to my sewing machine
and sewed her this little heart.
I then stitched it up with red embroidery thread.

Right before I left,
I gave it to her and told her to
hold onto my heart because
I'm coming back for it...

Thanks


share on: facebook

Wednesday, December 9, 2009

Okay, I'm Jealous...


There, I said it...
There aren't many women who can say they are jealous
of their husbands craft skills,
but I can say...

that

YES,


I am jealous.


He's knitting up some pretty
cool projects for family for Christmas,
and he's pretty darn good at it!
He just knit these adorable fingerless mittens for Lily...
she thought she was pretty cool wearing them
to the Boat Parade this past weekend...
thank goodness it was cold enough for her to wear them!
Click Here for the Pattern!

He's also making this....
a cozy for your coffee.


Next thing you know, he'll be doing the dishes...
a girl can dream right?

ps- Did you notice that it's snowing on my blog?
Living in Florida, I have to get it somewhere!

share on: facebook

Tuesday, December 1, 2009

Advent Wreath Tutorial- Using Clip Art

Advent Wreath Tutorial


You will need:

Contact Paper- Clear
Mini Clothespins 24 ct.
Small Wire Wreath
Scissors

Christmas Clip Art of Your Choice- My PDF here
24 Activities typed up to fit on back of clip art- MY PDF here


I first went on my Microsoft Word and typed in all the "Christmas-y" words I know in the clip-art search. I then adjusted them to the appropriate size.

Print out pictures and cut to desired sizes.

Lay out pictures with approx 4 cm between them so you have room to leave a small edge of contact paper around each picture.
Place all pictures face-up and lay contact paper on top making sure to avoid bubbles. It should look like this... with the back still sticky.
Print and cut out your Daily Activities and/or Verses see bottom PDF if you want mine for ideas. Place cut out activities face-up on back of pictures.
Place contact paper over the tops of activity cutouts and press firmly to eliminate bubbles. The front should look like this:
Cut out each picture and place in circle on wreath starting with Day 1 at top.


share on: facebook

Wednesday, November 25, 2009

Thankful... Tree.... Craft.... Fun...


So I saw this post a while back and really wanted to make one for my wall.

Here is what we came up with...
Here's how I did it....frugally

2 Paper Bags Cut Open
Freehand a Tree....shocking, I know.

Then you cut it out!
Tape to the wall...
Ask your kids what they are thankful for...
I felt special because I came right after Lily being thankful for pillows and the wall.
I used this leaf template.
I had them laminated for a church project, which I recommend because...
if you use a dry erase marker,
you can use them over again!

Write Thankful Things on Leaf of your choice, and have children tape to wall!
During this project
I let Lily practice her cutting skills
on a scrap piece of paper bag,
and I showed Claire how to Tear to increase
her hand-eye coordination....

I'm Thankful for my husband and my children, and our health....
What are you thankful for this Thanksgiving?
Thanks~


share on: facebook

Tuesday, November 17, 2009

"The Pillow" is Finally done..along with some new ideas!

So I finally finished my version of THIS Tutorial

and here is the finished project... I'll let you look first, then I'll tell you my issues :)


I really enjoyed this project, in fact it allowed me to use my own imagination...and come up with some of my own ideas...I know, who knew I even had them!

Firstly, I would recommend using the pillow form like she does in the tutorial. I used pillow stuffing and the pillow came out very lumpy (see evidence above)

Secondly, all of my edges are fraying on my appliques. I am not sure if this is the way its supposed to look or not, can't decide. Next time I might try the zig-zag stitch to cover the edges.

Now for my ideas in which pictures are to come
when I get around to actually making them:

To coincide with the topic of Weather on my Other Blog,
I thought it would be great to make weather pillows for Lily's bed. One side would have a sun, and the other would have clouds with rain etc....what do you think? They would be really small pillows, probably about 8-12" or so.
I also did some pretty cool stuff with Lily this week for this topic
if you are interested in Kiddy Crafts!

I am also wanting to see where I can go with the tree thing...
I think I want to try palm trees since we are down here in Florida.
I was also thinking of just doing a long grass pillow for my long scrap pieces.
I also want to do a Christmas Tree Pillow that's in the shape of a Christmas tree.

So I'm going pillow crazy, but at least I can pass out on
my work if I pass out from Brain Exhaustion :)


I also found out that there really is life after 30...yup, I'm there.


Thanks!


share on: facebook

Thursday, October 22, 2009

Cut the Scrap!

So I just found this project, and I REALLY want to do it with all of my scraps. I still have a ton of stuffing left over from my non-pumpkin blob project:)
Click on the pillow for the tutorial over at Cluck Cluck Sew... it looks pretty easy, but I did just screw up an easy pumpkin tutorial so you never know with me. I'll let you see the results after I go out and buy some Heat and Bond from JoAnn's with my 40% off coupon!


Also...
Have you been thinking about what you are going to make
for Halloween dinner?
Don't forget to Click Here at Razzle Dazzle Recipes
and pick something unique to make!

ITEMS ON MY "TO BUY LIST"
FOR CURRENT PROJECTS AT THE CRAFT STORE:


Heat and Bond-( for scrap pillow project above)

White Tempura Paint for Ghost Footprints
( I want to frame it and use it to show the girls each year how small their feet were!)

Nothing for THIS project! Too cute.

Butcher Paper or Roll Paper to make Ghost Garland...easy

Well, that's about it, my mother in law just got into town and she is VERY crafty..
so we'll see what she comes up with. I am still in the
"copy other peoples ideas stage" and am lacking in the personal creativity department..hopefully this will start flourishing soon!

Thanks


share on: facebook

Tuesday, October 20, 2009

I made some things!

So I finally got around to making some things!
I found some old wood scraps that my husband had and I was inspired.

He also had some black spray paint and was kind enough to spray paint them for me.

Then my husband pulled my acrylic paints out of hiding from the garage.


Three blocks = three letters. Love the font....

Then I found another scrap piece of wood,
asked my husband if he "was gonna use this guy"
and had my husband spray it white...

I found a cute little stamp online that said
Frightful and Delightful.

I searched for similar fonts, enlarged it and this is what I came up with.
I can't decide if I should add anything to this block of wood.

It seems kind of empty but my husband thinks it makes it look "simple chic"...
hey, he said it, not me :)

Now for my craft that did not work!

Remember this post? With this tutorial?

This "pumpkin" was only supposed to have 6 patches, and ended up having 8 which therefore created a "non-circle" blob.

The stem is also not in the middle
since I sewed it to one of the pieces and not all....

We enjoy throwing it around and
bopping people with it though,
so I guess it was worth it.

I am going to try again and this time use my fingers to count.

And now it's time for a few pictures from the Pumpkin Patch!


Thanks!


share on: facebook